Recipe: Bake-Once Biscotti

img_8698-_snapseed
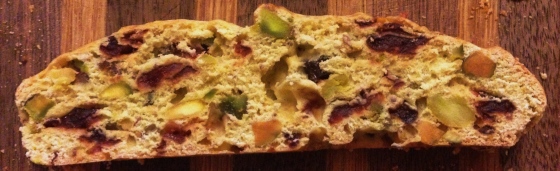
It had never really crossed my mind to try to bake biscotti before, but I came across the following recipe over the holidays and decided to give it a whirl. This calls for only baking once, instead of twice as is tradition, so I thought it would be a good way to ease into the world of baking biscotti.

Ingredients
– 1 1/2 c. sugar  – 12 eggs  – 1/2 tsp salt  – 4 1/2 c. flour  – 1 tsp baking powder  – 2 c. dried tart cherries  – 2 c. pistachios  – 1 Tbsp water

Directions
Separate 8 eggs, keeping the yolks (I saved the whites for a frittata later in the weekend). In a stand-up mixer with the whisk attachment, beat the 8 egg yolks, 3 whole eggs, the sugar and salt for about 5 minutes. The mixture will be thick and a pale yellow. Replace the whisk with the paddle attachment, and mix in the flour and baking powder until well-combined. I did this in 2-3 rounds.

img_8660-_snapseed
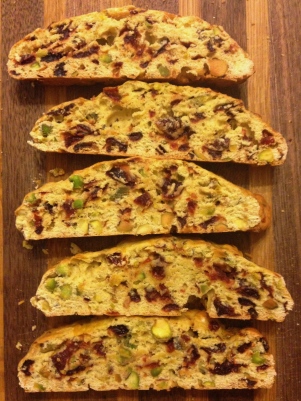
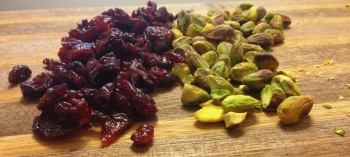
Chop the dried tart cherries and shelled pistachios (I found both at Whole Foods, and any store with a bulk section should have these ingredients available). Though you can use them whole, as originally suggested in the recipe, I roughly chopped them, as I believe the final biscotti slices are easier to eat with smaller mix-ins.

Mix in the cherries and pistachios until just combined. The dough will be very sticky – I found it difficult to scrape the sides of the bowl, and had the spatula top pulled from the handle a few times during the process.

Separate the dough into two equal portions onto plastic wrap – I did so with my hands given the stickiness – and refrigerate for at least an hour.

img_8682-_snapseedPreheat the oven to 325 degrees. Shape the dough into 12″x5″ logs and place on parchment paper. I was able to fit both onto one cookie sheet, and did most of the stretching mid-air, as the dough remains quite sticky!

Combine 1 whole egg and 1 Tbsp of water, and brush the mixture onto each rectangle before baking.

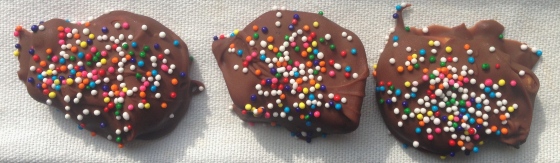
Bake for 35-45 minutes until the top is golden brown. Cool for 10 minutes on the baking sheets, then transfer to a cutting board to cut 1/2″ slices. Completely cool before serving or eating, about an hour.

While the end results were quite tasty, I am not sure the process of making and baking biscotti is a good fit for me. Ever made biscotti before? Have any tips, particularly for how to deal with the very very sticky dough? I am open to any suggestions you may have!

Until next time,
SugarSource

Recipe: Seven-Minute Frosting, Stand Mixer Edition

img_8526-_snapseed

Initial texture of the frosting

When making my grandmother’s sugar cookie recipe, I knew I had a potentially daunting task to complete the treats as she had traditionally prepared them – making seven-minute frosting. As someone who does not own a hand-mixer, I found this particularly challenging until I discovered a hack from Food.com, which I am sharing here with a tweak or two!

Ingredients
–  3/4 c. sugar  – 1 tsp vanilla extract  – 1/4 tsp cream of tartar  – 3 egg whites  – 1/4 c water

Directions
Combine the granulated sugar, vanilla, cream of tartar and egg whites. Add in 1/4 cup boiling water – I used a tea kettle and quickly measured out the necessary amount in a Pyrex liquid measuring cup – and beat for 7-9 minutes.

img_8516-_snapseed

A bit of “bubbling”

I found this recipe made more than enough icing to properly frost a batch of cookies.

One note: while it was very pliable and shiny at the beginning, small bubbles seemed to develop over time and the shine disappeared. If anyone has tips on how to ensure this doesn’t happen – such as occasionally rebeating – I am open to suggestions!

Until next time,
SugarSource

Recipe: Coconut Marshmallows

img_8561-_snapseed
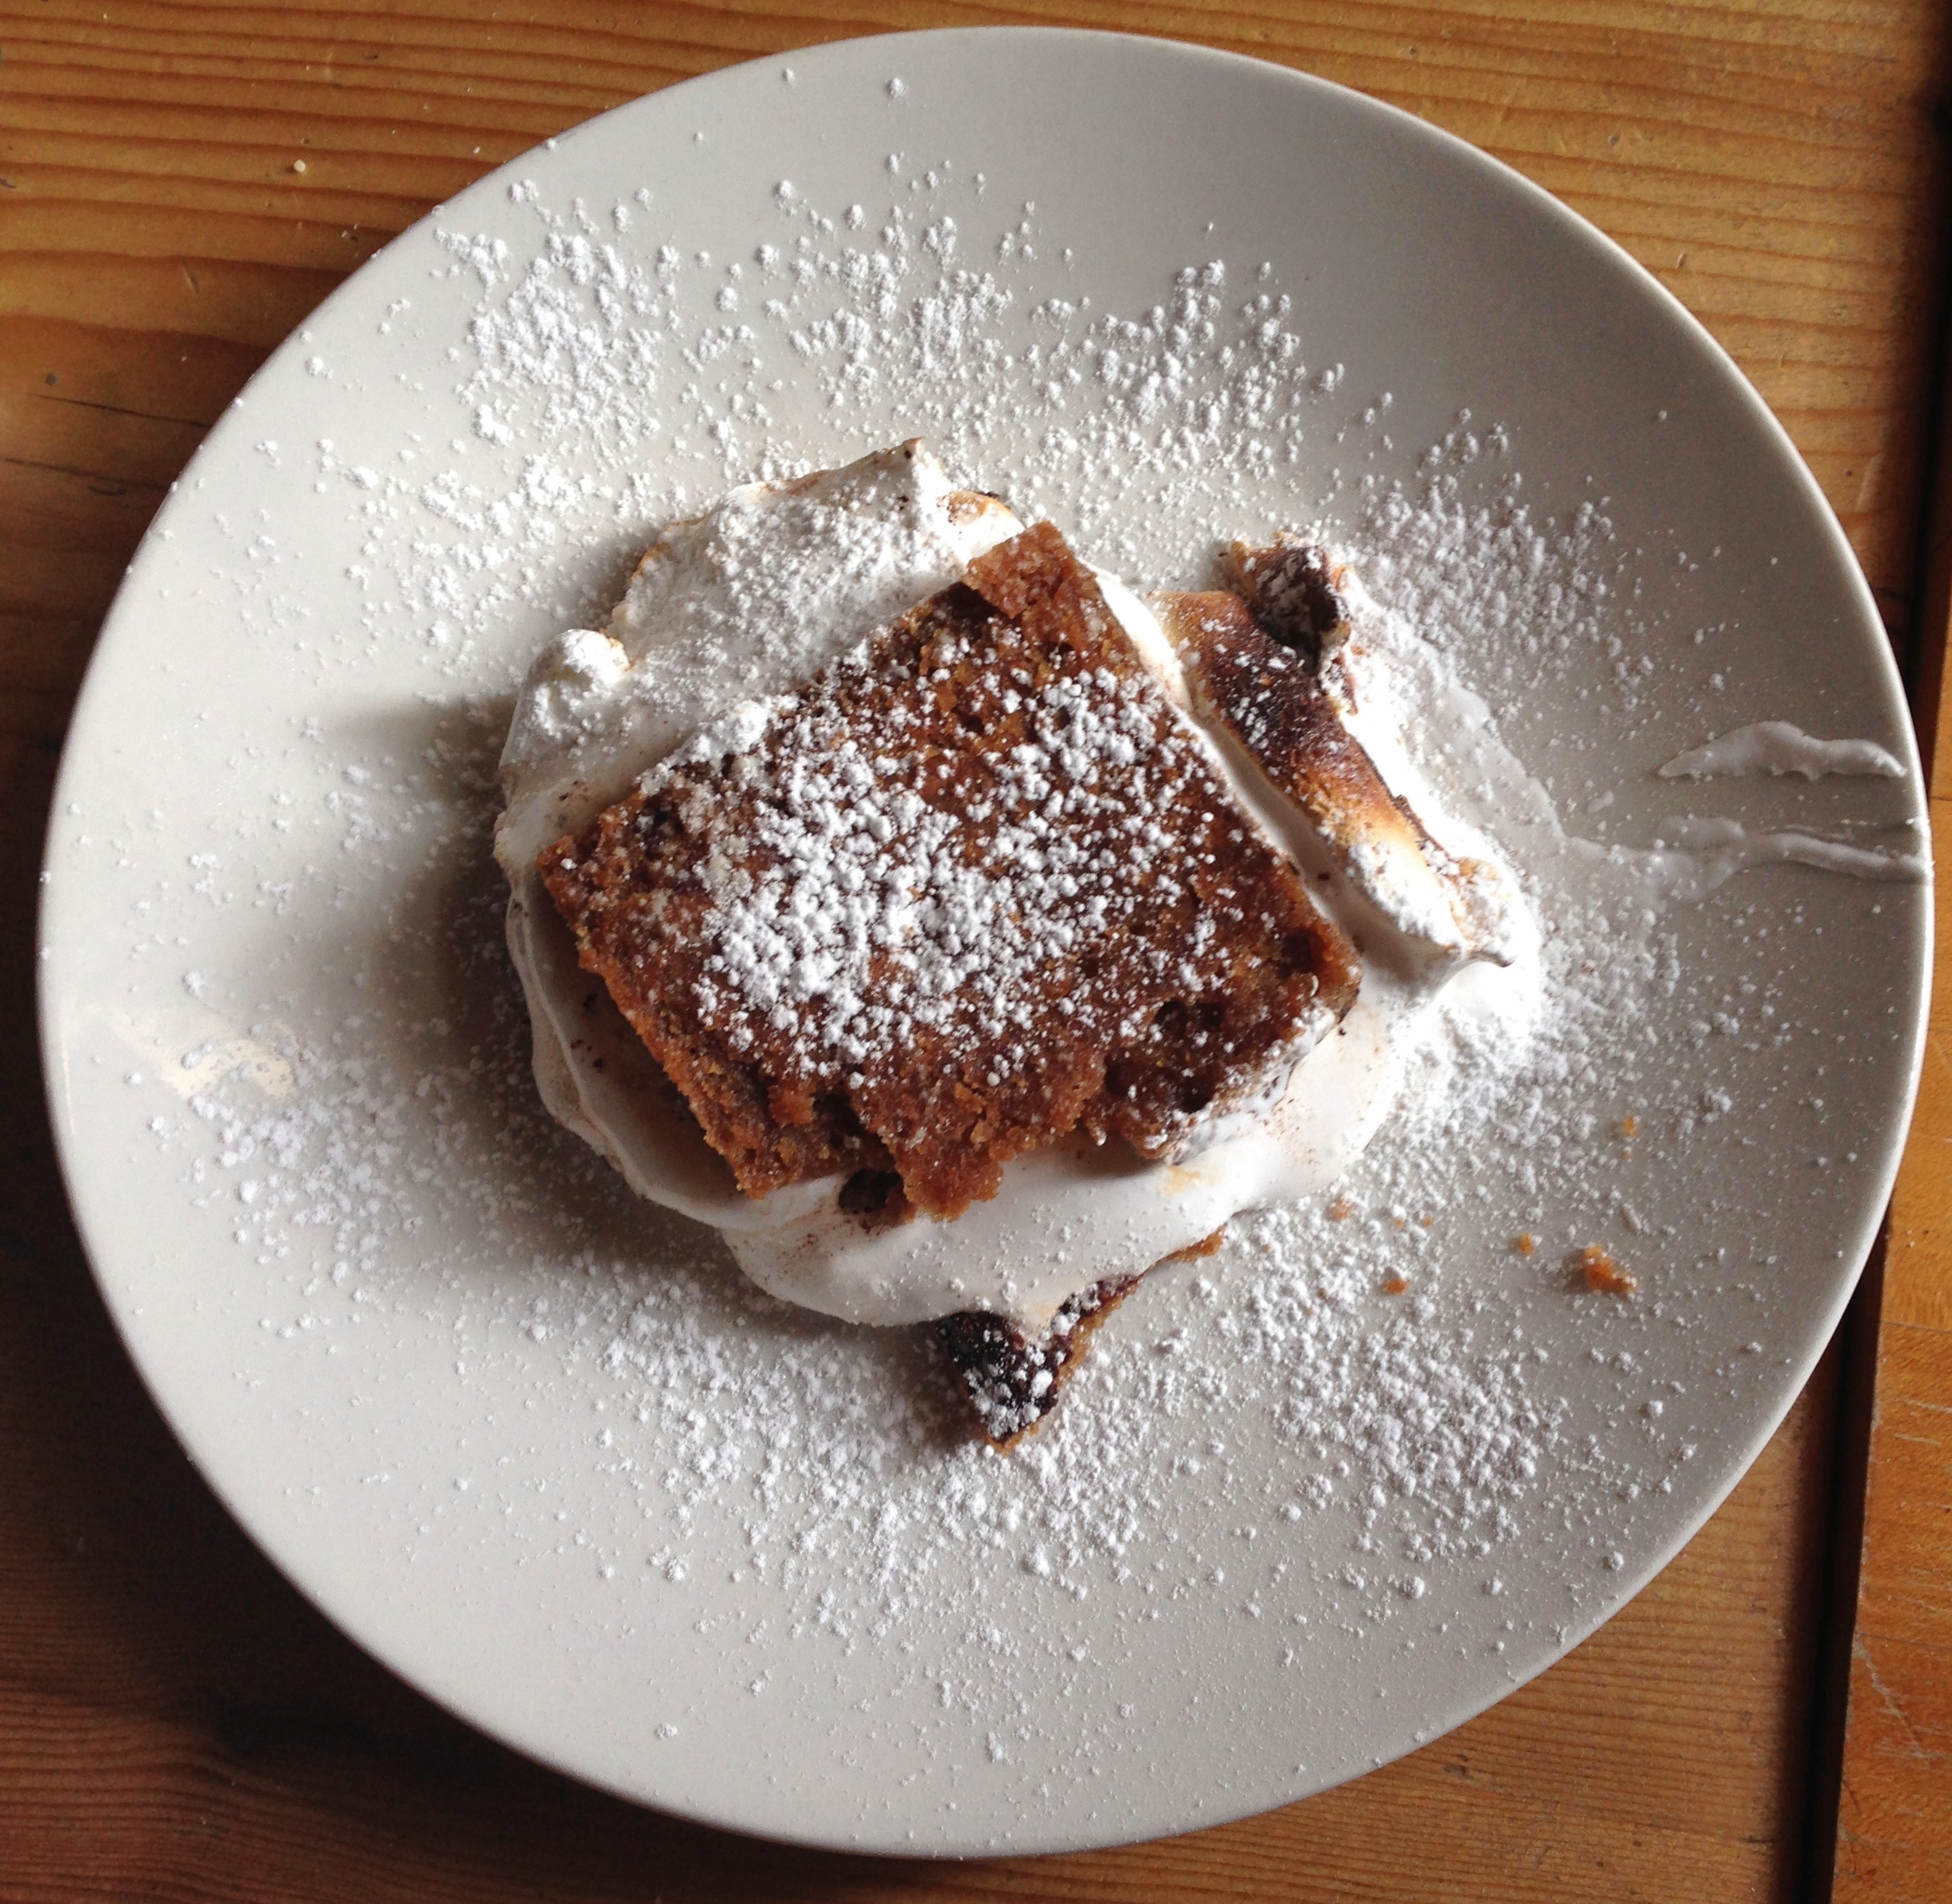
I stumbled upon this coconut marshmallow recipe over a year ago, and finally decided to make it this year. If you have ever thought about trying your hand at homemade marshmallows, give these a whirl! They are a fantastic accompaniment to a cup of hot cocoa, provide a twist on the traditional s’more and are delicious on their own.

Ingredients
– 3 pkgs unflavored gelatin  –  water  – 1 1/2 c. sugar  – 1 c. light corn syrup  – 1/4 tsp salt  – 1 Tbsp vanilla extract  – powdered sugar  – sweetened shredded coconut

Directions
If the coconut you purchased is sweetened and shredded but not toasted, you can quickly toast it in a large skillet. On medium heat, it will take 5-7 minute total for roughly 12 ounces of coconut. A few pieces will brown here and there, and then suddenly anything that it touches the bottom of the pan will be toasted in a flash. At this stage, stir constantly for even toasting and to avoid burning. Set aside – this step can be completed hours before the next!

Combine 3 envelopes or packages of gelatin and 1/2 cup of cold water in a stand-up mixer. You will need the whisk attachment in a few steps – this is a great time to ensure it is in place.

img_8557-_snapseed
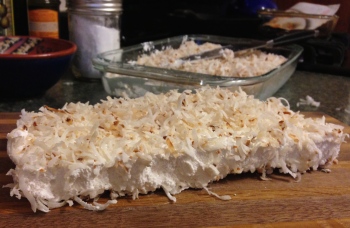
In a small saucepan, mix the sugar, corn syrup,  salt and 1/2 cup water, cooking on medium. Once the sugar has dissolved, increase to high and cook until the mixture reaches 240 degrees on a candy thermometer. It will be boiling – that is to be expected – but watch for any bubbling that could spill over the edges. If this happens, pick up the pot and set it back on the burner once the bubbling as subsided.

Another tip: any sugary mixture that has hit the sides of the pot may start to burn, particularly at the top of the saucepan. I removed my smoke detector temporarily as I noticed this starting to happen. However I returned it immediately once I completed the next step. Safety first!

On low speed, add the hot sugar syrup to the gelatin in the mixer. Be careful, as the mix was just boiling a moment ago. Once combined, whip on high for 15 minutes. It will resemble a meringue, but will be heavier. Add the vanilla, and mix until well-combined.

img_8565-_snapseed
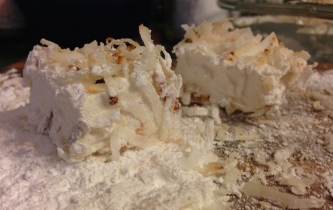
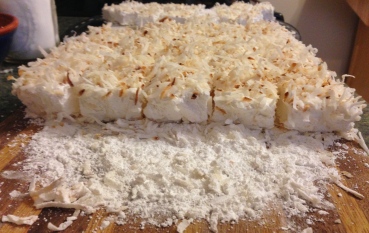
In a 13″ x 9″ glass pan (I used Pyrex), heavily dust the bottom with powdered sugar and then sprinkle roughly half the toasted coconut on top. Pour the marshmallow mixture next, and use a spatula to smooth out the surface. It will be sticky! Sprinkle the remaining coconut and allow to dry overnight – at least 12 hours.

Once dry, use a sharp knife to cut along the edges of the pan and flip onto a cutting board to slice into rectangles, squares or whatever shape you prefer. I chose to cut my marshmallows in sections due to the size of my cutting board. Roll each side of every marshmallow in powdered sugar, as they will be very sticky otherwise. Eat immediately, share with loved ones, or store in an airtight container. And most importantly – enjoy!

Until next time,
SugarSource

P.S. For easy clean-up, put water in tea kettle and set it on high while you are slicing. When you are done with the marshmallows, place your pan in the sink and pour the boiling water over the dish, paying particular attention to the areas where the mallow stuck the most. You can also occasionally run the knife under hot water if you find it is starting to gunk up as you use it!


Travel Spotlight: Please and Thank You

We were in Louisville for Thanksgiving, and as we went for a post-meal walk, we discovered a cute little coffee shop on Frankfort Ave called Please & Thank You. Closed that day, we decided to retrace our steps that weekend to check it out.

The coffee was good and provided the necessary caffeine boost we were looking for, and the breakfast panino was simple and filling. The real star of the visit, however, was their chocolate chip cookie. Shards of dark chocolate dotted every bite of the soft treat, and it was gooey in the middle with a texture reminiscent of slightly under-baked cookie dough. I wish I had snapped a photo or two, but was too engrossed in the experience. Quite rich, we had to split one but immediately purchased a bag to-go, as we felt compelled to share the delights with friends and family.

If you ever find yourself in Louisville, this is a must-try. They were voted Louisville’s Best Chocolate Chip Cookie for a reason!

Until next time,
SugarSource

Travel Spotlight: Galapagitos


IMG_7381 _Snapseed

We had the opportunity to visit Ecuador this past September and had an incredible time. As we reflect on our trip, Galapagitos resemble the pink and white frosted animal crackers sold in America today but are slightly different. They are smaller, coated in milk chocolate and absolutely covered, front and back, in multicolored non-pareils. The tiny sprinkles contribute an added crunch to the treats.

Upon returning to the States, we searched for Galapagitos, both online and in-store, to no avail. We felt we had no choice but to attempt to recreate them at home. It requires only three ingredients and a little time, but we found it was absolutely worth it and loved introducing friends, family and coworkers to the treats. IMG_7365 _Snapseed

You will need animal crackers (we chose Keebler), milk chocolate chips (Ghiradelli for this last round), and a shaker of non-pareils. For a 13-ounce bag of animal crackers, we found we needed 2 12-ounce bags of chocolate chips to properly and fully coat the crackers.

After tempering the chocolate over a double-boiler (created by layering a Pyrex bowl over a sauce-pan with a 2-inch layer of boiling water), we quickly dipped the whole animal crackers into the chocolate. Once completely covered, we placed them on a baking sheet covered in parchment (or wax) paper. While one of us did the dipping, the other did the sprinkling. To ensure they are completed coated on both sides, I would recommend pre-sprinkling the parchment-lined baking sheet.

IMG_7379 _SnapseedTo quickly cool, we pop these into the freezer. They are ready for guests to enjoy within the hour, and last for 1-2 weeks (though we have found they are long-gone before then).

Until next time,
SugarSource

Unexpected Find: Home-Colored Sugars

IMG_7378 _SnapseedIn preparation for baking our first King Cake, we went on a neighborhood-wide search for yellow, purple and green colored sugars. We were only able to find red, green and blue, venturing from store to store in vain. After discussing the merits of dyeing the frosting, thus incorporating the traditional Mardi Gras colors into the cake, we stumbled upon a trick so easy, it’s hard to believe I haven’t come across it before!

In a small glass jar with a lid, I mixed 1/2 cup white granulated sugar with 2-3 drops of food coloring. After some vigorous shaking, the sugar was transformed. It was amazing! I would recommend shaking immediately after the dye has been added (and the lid has been secured). The longer the liquid sits on the sugar crystals without movement, the more it starts to stick to a few, reducing the overall distribution.

IMG_7375 _Snapseed

The next time you find yourself without the proper colorful sugars – especially around a holiday – give this a try. To get a coarser texture, you can opt for a different kind of sugar. Sugar in the Raw, for example, was the base for our purple, creating a deeper, richer shade.

Until next time,
SugarSource

Unexpected Find: The Delayed Egg Wash

As you may know, my second attempt at croissants resulted in a quite pale version of the original. After realizing a little late in the initial baking process that I had not slathered egg wash atop each roll, I was disheartened at the pasty pastries that I extracted from the oven. As I gazed at their less-than-glossy surfaces, I wondered if I could apply the egg wash and try a second round in the oven. Would this ruin them for good, or revive them? I had to try!

IMG_7307 _Snapseed
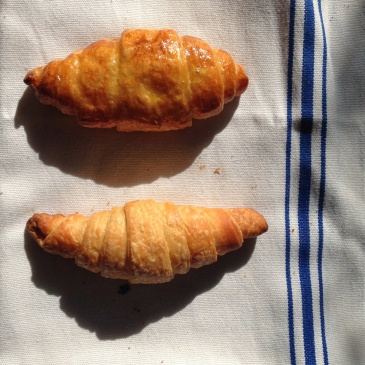
At the same baking temperature as before – 360 degrees – I applied the wash to one previously baked croissant (using more yolk than white), and left one without to test the variation. In they went for roughly 6 minutes. At first there appeared to be no observable difference between the two but, after the time was up, there was a remarkable transformation for one. It became golden, the texture of the pastry more pronounced (and most certainly more appetizing).

What I did not expect was that the croissants themselves would thus feel so different. The egg wash infused the first with moisture, allowing for an easy tear reminiscent of the first croissants I had baked. The second “unwashed” version was difficult to separate into two halves, seeming to have gotten drier and tougher.

All in all, I now know that I could have popped out the croissants the moment I realized the wash was missing, painted it atop each proofed piece of dough, and the pastries ultimately would have been fine. A successful experiment, but one I hope not to repeat (by remembering the wash in the first place)!

Until next time,
SugarSource

Unexpected Find: S’more, please!

IMG_7089 _SnapseedToby’s Public House in South Slope, Brooklyn is a well-established pizza place. The smoked pancetta pie is a personal favorite, beautifully combining exceptional ingredients to create an incredible experience. But today is not about the pizza. It is about the unexpected and delightful dessert offered at this restaurant.

We knew the s’mores were arriving at the table before we saw them because we could smell them, specifically the wonderful smell of melted chocolate. IMG_7088 _SnapseedQuickly the dessert came into view, and the table audibly reacted. The s’more was oozing with marshmallow that was toasted to a fine caramel sheen on the edges. The homemade “graham cracker” was sizable, but could not contain the rambunctious mallow. We quickly dove in with our forks, discovering the melted chunks of dark chocolate hidden within.

It was sizable enough to satiate four adults post-pizza, and well worth the short wait. The wood-fired roasting technique of the dish tips it into the realm of absolutely delicious. This dessert has been added to the “must order” list at Toby’s, that is for certain.

Until next time,
SugarSource

Unexpected Find: Bananaless Banana Cream Pie

The discovery was made at The Comet Cafe in Milwaukee, Wisconsin. The establishment offers sweet and savory options for a stuffed-to-the-brim brunch, and I had to make a concerted attempt to leave room for dessert. In this instance, the pie selection proved to be too tempting, and I ordered a slice of banana cream pie to go. It was a hefty helping, and the to-go container sagged slightly from the weight of the decadent dessert.

I was finally ready to try the treat, and opened the cardboard container quickly in anticipation of the lovely sweetness contained within. Little did I expect to be disappointed…and unfortunately I was. I could only find one measly slice of banana amongst the piles of vanilla pudding and whipped cream. Though both were great, I had not purchased a banana cream pie to consume vast quantities of either of these without layers of banana to help break-up the dense, heavy filling.

This post offers a word of caution when pursuing the perfect banana cream pie. If the featured fruit is not visible, you may be in for an unwanted surprise.

Until next time,
SugarSource

Unexpected Find: DQ Cupcake

IMG_6379 _SnapseedSummer is a wonderful time to enjoy simple pleasures, like running through sprinklers, attempting to catch fireflies, and indulging in ice cream cake. I experienced an interesting twist on this last luxury during a chance visit to a Dairy Queen recently. Though it appeared like any other, this particular location was different, as it had…ice cream cupcakes. There was only one remaining in the case, and I knew it was destiny.

I allowed the little cup of joy to thaw for a few minutes, then began to dig into the layers. The first was light, fluffy whipped topping traditionally piped along the edges of DQ’s cakes. Underneath I discovered chocolate ice cream heavily peppered with cookie dough bites. Though patience was required, I eventually reached the semi-sweet fudge and chocolate crunch layers unique to this chain’s cakes. The final layer was traditional vanilla soft-serve. It was a hearty serving for one person to consume and I was up for the challenge (though I did share a few spoonfuls with my companions). The whole experience was as delightful as the larger cakes, and provided for the satisfaction of polishing off the small sundae cup in one sitting.

When I next swing by a Dairy Queen (most likely around this time next year), I will be searching for these little gems and I would highly recommend doing the same!

Until next time,
SugarSource