Recipe: Traditional King Cake

IMG_6355 _SnapseedIn honor of Mardi Gras, I attempted to bake a traditional King Cake. I modified a recipe from Nola.com, which seemed to be an appropriate source for such an endeavor.

Ingredients
– 5 c. flour  – 1/2 c. sugar  – 1 1/2 tsp salt  – 2 packets instant yeast  – 3/4 c. whole milk  – 1/2 c. water  – 1 c. butter  – 3 eggs  – 1 tsp lemon zest  – 1 Tbsp cinnamon  – dash of nutmeg  – 1 tsp vanilla  – powdered sugar

Recipe
Combine the milk, water and butter in a small saucepan on the stove. Slowly bring up the heat, stirring occasionally. You are looking to reach 120-130 degrees (for reference, milk boils at over 200 degrees Fahrenheit). I used a small candy thermometer to pace properly.

In a mixing bowl (I used my KitchenAid stand mixer), combine 1 1/2 cups of flour with the sugar, salt and instant/rapid yeast. Once the liquid on the stovetop has reached 120 degrees, combine with the flour mixture and mix on medium speed for two minutes. You will start to smell the yeast activating – it will not resemble a traditional cake batter (and it’s not supposed to!).

Add 2 eggs, 1 egg yolk, 1/2 cup flour, lemon zest, cinnamon, a dash of nutmeg (1/8 teaspoon would be fine) and vanilla. Beat on medium-high speed for two minutes, stopping to scrape the sides occasionally, then slowly add in the remaining 3 cups of flour.

Transfer the dough to a large bowl coated with cooking spray. You want to ensure the dough has room to expand. Cover in plastic wrap and refrigerate for two hours.

IMG_6351 _SnapseedOnce the dough has chilled for two hours, punch the surface down and turn out onto a lightly floured surface. First shape the dough directly with your hands – you are looking to achieve a rough rectangle. Then, using a floured rolling pin, slowly roll the dough to a rough 24″ by 12″ size. Continue to run your fingers or a spatula underneath the dough to ensure it isn’t sticking to the surface.

Melt 2 tablespoons of butter, and brush onto the surface of the dough using a pastry brush. Lightly sprinkle cinnamon and sugar (I combined 1/3 cup sugar and 1 tablespoon of cinnamon into a shaker) across the entire surface, aiming for even and complete distribution. Beginning on one of the long sides, roll the dough tightly. You are aiming for a long thin log, not a short thick log. In my first attempt I almost started rolling from a short end but quickly caught my mistake!

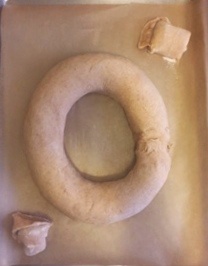
Transfer the roll onto a baking sheet lined with parchment paper, shaping into an oval and pinching the ends together to complete the ring. I sliced off the uneven end pieces, baking them separately to give me a sense of the cake’s composition (you see them in the photograph above). You want to leave as much space in the middle of the oval as possible, as the dough expands quite a bit.

Cover the dough ring with a clean dish towel and place in a warm area of the house for about an hour. You are proofing the dough, a key step with yeast-based dough.

Preheat the oven to 375 degrees, and bake for 25-30 minutes until golden brown. Carefully check the center of the round to ensure it has properly cooked through. Let it cool on the pan for 5 minutes, then transfer to a baking rack to cool completely. For the transfer, use two spatulas. Do not attempt to solely pick up the parchment paper – this is a sure way to lose the cake you just baked!

Decorating
IMG_6358 _SnapseedAfter the cake has had the chance to cool completely – I left for a few hours with the clean dish towel draped over the top – mix 2 cups of powdered sugar with 1 tablespoon of milk (again, I used the KitchenAid stand mixer for expediency). Slowly and cautiously add additional liquid as needed – you do not want it to be too liquidy. Drizzle the icing over the cake. My first icing unfortunately had too much milk, so I used it more as a glaze with my pastry brush. You can either dye the icing in the traditional yellow, green and purple of Mardi Gras, or coat the icing in colored sugars. I chose the sugars, which I like both aesthetically as well as texturally, and made them myself because I couldn’t locate them in local stores!

The cake absolutely needs the icing and additional sugar, as it is not a particularly sweet batter. It is at this stage where you can add the traditional “good luck” baby as well. You do not want to ever actually bake plastic into the cake, but instead insert after the cake has cooled through the bottom. We used a small plastic dinosaur from the 99 cent store, putting our own personal twist on it.

This easily serves 14-16 people, depending on the voracity of appetite. Once the cake has been cut, this starts to dry out almost immediately. If somehow you manage to have a section left, I would allow it to dry out completely to use the remaining bread in a simple bread pudding. Enjoy, and Happy Mardi Gras!

Until next time,
SugarSource

Unexpected Find: The Delayed Egg Wash

As you may know, my second attempt at croissants resulted in a quite pale version of the original. After realizing a little late in the initial baking process that I had not slathered egg wash atop each roll, I was disheartened at the pasty pastries that I extracted from the oven. As I gazed at their less-than-glossy surfaces, I wondered if I could apply the egg wash and try a second round in the oven. Would this ruin them for good, or revive them? I had to try!

IMG_7307 _SnapseedAt the same baking temperature as before – 360 degrees – I applied the wash to one previously baked croissant (using more yolk than white), and left one without to test the variation. In they went for roughly 6 minutes. At first there appeared to be no observable difference between the two but, after the time was up, there was a remarkable transformation for one. It became golden, the texture of the pastry more pronounced (and most certainly more appetizing).

What I did not expect was that the croissants themselves would thus feel so different. The egg wash infused the first with moisture, allowing for an easy tear reminiscent of the first croissants I had baked. The second “unwashed” version was difficult to separate into two halves, seeming to have gotten drier and tougher.

All in all, I now know that I could have popped out the croissants the moment I realized the wash was missing, painted it atop each proofed piece of dough, and the pastries ultimately would have been fine. A successful experiment, but one I hope not to repeat (by remembering the wash in the first place)!

Until next time,
SugarSource

Spotlight: Croissant Class – Take Two

IMG_7298 _SnapseedAfter initially taking the croissant class at Mille Feuille in December, I thought I was ready to tackle baking croissants. The course may have left me a little overconfident, and my first batch proved to be less-than-appetizing. With that in mind, I wanted to share my top tips:

  • Do not let the dough proof before you have rolled and assembled your croissants. Upon departing Mille Feuille, I proceeded to run errands for hours, allowing the dough plenty of opportunity to rise in my purse. Though it did not make it mess, it did complicate the rolling and proofing process once I was ready to make use of it.
  • Related, but somewhat different: do not allow your dough to get too warm. The butter will start to melt, reducing the overall flakiness of the pastries.
  • Do not attempt to use the dough after a few days. The yeast will slowly lose its ability to activate.
  • Do use a good amount of flour to help with the rolling process, but do not forget to brush it off before you assemble or proof the pastries. Excess flour can lead to a bitter or distorted taste.
  • If you do not have a convection oven, placing an empty baking sheet below the sheet with pastries helps to create a convection-like environment.
  • Do not forget the egg wash step after proofing! Croissants have that beautiful golden-brown hue because of this step and it should not be overlooked. Otherwise, they may turn out like the above!

I will give croissants another shot, from start to finish in my own kitchen, using the directions provided by the instructor.

Until next time,
SugarSource

Spotlight: Croissant Class – Take One

IMG_7179 _SnapseedI finally took the plunge, and signed up for a croissant class at Mille Feuille‘s Laguardia Place location in Greenwich Village this December. As a huge fan of their croissants for years, this felt like the appropriate place to begin my tutelage.

The participants slowly began trickling into the back of the small storefront. Our instructor introduced himself, provided aprons for everyone and started class. We began by shaping our croissants, as they needed to proof before baking. Typically baking croissants is a three-day process, but this has been condensed considerably for this three-hour course! Our instructor walked us through the basic shapes and techniques, and provided constructive criticism to improve our individual trays of treats. After we had worked our way through the dough provided, rolling as carefully as possible, he popped them into the proofing drawer.

From there, he demonstrated the butter-layering process. I am embarrassed to say I had no idea how much butter was added to these delightful breads. After beating our slabs of butter into rectangular shapes, we slowly began the rolling, folding and re-rolling process. It was quite the lower arm work-out, and I was thankful to be moving around, as the air-conditioning made the room chilly. Our instructor would later inform us that it needed to be relatively cold in the room to ensure the butter did not begin to melt, which would ruin the croissants. They do recommend bringing an extra sweater in the event it is too cold!

After the croissants were done proofing, we slathered them in egg wash, re-arranged them on our trays for optimal baking, and then he placed them into the oven. He used a few of the leftover slivers as “appetizers,” and they were a delicious way to create a natural break for the class. I only wish they had provided the hot drink (described online), but unfortunately one was never offered.

Finally, he showed us how to make the dough and how to test if the gluten has been activated. A pro tip: if the gluten has been activated, croissant dough can be used as pizza dough instead!

All in all, the session was very informative, and I left the bakery with over 15 croissants and my own butter-layered dough for baking my next versions at home.

I would absolutely recommend it to anyone looking to learn more about how croissants are made or to hone their baking skills. Next up will be the macaron class!

Until next time,
SugarSource

Recipe: Farm Boy Baker’s Bacon Oatmeal Chocolate Chip Cookies

IMG_5864 _SnapseedA good friend of mine, fondly known as the Farm Boy Baker, shared the following recipe as a way to beat the winter doldrums, which daringly combines oats, chocolate chips and bacon into a cookie that is sure to please.

Ingredients
– butter  – eggs  – brown sugar  – sugar  – vanilla  – salt  – baking soda  – white flour  – whole wheat flour  – bacon  – semi-sweet chocolate chips  – quick-rolled oats

IMG_5859 _SnapseedDirections 
Preheat the oven to 350 degrees. In a mixer (KitchenAid is my long-standing partner in the kitchen), beat 1 cup brown sugar, 1/2 cup white sugar and 1 cup butter until well-combined. Beat in 2 eggs and 1 teaspoon vanilla.

Slowly add the dry ingredients – 3/4 cup whole wheat flour, 3/4 cup white flour, 1 teaspoon salt and 1/2 teaspoon baking soda – stopping the mixer to scrape the sides of the bowl several times. Gradually mix in 2 1/2 cups oats, 2 cups semi-sweet chocolate chips, and 4 slices of bacon, cooked and finely chopped.

Plop 1 1/2″ dollops of the dough – you will find it is quite sticky – onto ungreased baking sheets, baking for 12-14 minutes, and allow to cool on wax paper.

The outside crispy from the butter, and the inside chewy from the oats, smoky from the bacon and delightful dashes of sweetness from the chocolate chips. Incredible. A perfect accompaniment to hot chocolate on a cold winter’s night!

Until next time,
SugarSource

Recipe: Coconut Chocolate Chip Cookies

IMG_2300This is slight twist to the first recipe for chocolate chip cookies I ever learned. Convinced it was a family recipe passed down generation to generation, I discovered at an older age that it was essentially the Better Homes and Garden version. As palates evolved and preferences shifted, we recently added coconut to the mix, contributing a subtle, more complex flavor and chewier texture overall to the classic cookie.

Ingredients
– butter  – shortening  – brown sugar  – granulated sugar  – baking soda  – salt  – eggs  – vanilla  – flour  – semi-sweet chocolate chips  – finely shredded coconut  – finely chopped walnuts (optional)

Directions
Preheat oven to 375 degrees. Cream 1/2 cup butter and 1/2 cup shortening for 30 seconds on medium speed. Scrape the bowl, and add 1 cup packed brown sugar and 1/2 cup granulated sugar; beat until light and fluffy. Scrape again, and mix in 2 eggs and 1 tsp of vanilla.

In a separate bowl, mix 1/2 tsp salt, 3/4 tsp baking soda, and 2 1/2 cups flour. Gradually add in dry ingredients, mixing completely. I typically don’t take the “separate bowl” step if I’m using my KitchenAid – I will just add in the dry ingredients slowly to the eggy, sugary mixture in the bowl. Fold in 12 ounces (3 cups) of semi-sweet chocolate chips and 1/4 cup of coconut (you could replace the coconut with 1/4 cup walnuts if you prefer).

IMG_1050Using a spoon, drop 1-2 inch cookies onto an ungreased cookie sheet – I find I can successfully fit about 15 cookies on a standard sheet. Bake for 8-13 minutes, rotating the sheets halfway through.

Serve warm (with the chocolate melting as you break apart the cookie), and always with a glass of milk.

Until next time,
SugarSource

Recipe: Pumpkin Bread

Screen Shot 2013-11-14 at 7.08.13 AM

Photo credit: Anna Maund

Although I focus predominantly on the consumption of baked goods of all various shapes and sizes, inspiration does occasionally strike. I am overcome by a furious desire to bake and wind up in the kitchen, powering up my KitchenAid and preheating the oven. In honor of the flavors of fall and my love of pumpkin, I have posted my favorite recipe for pumpkin bread. Best served without accoutrements like jams or butter, the spices in this household classic pack a fantastic punch. Be warned: you may find yourself tempted to eat half of the loaf while it is still warm…

Ingredients

– flour   – brown sugar   – white sugar    – canola/olive oil  – eggs    – pumpkin (canned is fine)   – water    – baking soda    – baking powder   – salt   – cinnamon    – allspice  – mace   – cloves   – pumpkin pie spice  – nutmeg  – dried cranberries    – walnuts, chopped finely

Directions

Preheat oven to 350 degrees. In a large mixing bowl (I use my KitchenAid), beat 4 eggs. Add 1 cup brown sugar and 1 cup white sugar, beating well and scraping the sides. Add 1 cup olive oil and beat again (if you typically cook with a strong or very flavorful olive oil, use canola oil instead). Mix in 2 cups of pumpkin, once again scraping the sides of the bowl. Stir in dry ingredients – 3 1/2 cups flour, 2 tsp baking soda, 1/2 tsp baking powder, 1 tsp salt, 2 tsp cinnamon, 1 1/2 tsp total (allspice, mace, cloves and/or pumpkin pie spice), 1/2 tsp nutmeg – alternating with 2/3 cup water. Scrape occasionally to make sure everything is evenly distributed. Stir in 1 cup dried cranberries and 1 cup chopped walnuts (optional additions).

IMG_2940

Pour into 2 9″x5″ loaf pans and bake at 350 degrees for 60-80 minutes, depending on your oven and elevation. The wonderful scents of nutmeg, cinnamon, allspice and cloves should quickly start wafting through your kitchen, enticing anyone home to wander into the general vicinity to see what is baking. Once the bread is done (the top should have a light crust and be springy to the touch, and a toothpick should come out clean), set on cooling rack for 10 minutes. Remove the bread from the pans – you may need to run a knife along the edges of each loaf pan – and cool completely. Wrap tightly in plastic wrap and refrigerate overnight. To freeze, first wrap tightly in plastic wrap followed by tin foil. Slice and serve as desired. No doubt about it – this will disappear quickly!

Until next time,

SugarSource